Rapid API Development with Azure API Management and GPT
Did you know that you can rapidly develop REST APIs using GPT Prompt Engineering? In this article, I show how you can use Azure API Management (APIM) inbound and outbound policies to create useful REST API utilities.
What is Prompt Engineering?
Prompt Engineering is a concept in artificial intelligence, particularly natural language processing (NLP). It involves designing prompts or input text to generate specific output text using machine learning algorithms. The description of the task is embedded in the input, e.g., as a question instead of it being implicitly given. Prompt engineering typically works by converting one or more tasks to a prompt-based dataset and has played a significant role in improving the performance of various AI models (Source: Wikipedia)
For developers, we can use prompt engineering so that GPT will return values that we can use with our code, such as JSON or 1 and 0. Here is an example:

However, as you can see with the above, parsing the choices token from JSON-escaped string into proper JSON will still take some coding work. This is where APIM policies come in. After configuring the policies, APIM can improve the response to this:

Rapid API development with GPT Prompt Engineering and Azure API Management Policies
Policies in Azure API Management is a big topic. For the purpose of this article, we are using its ability to:
- Rewrite URLs,
- Convert Request and Response bodies, and
- Use C#
With Azure APIM, we can generate the prompt in-policy, and then return a response that is easier for our code to handle.
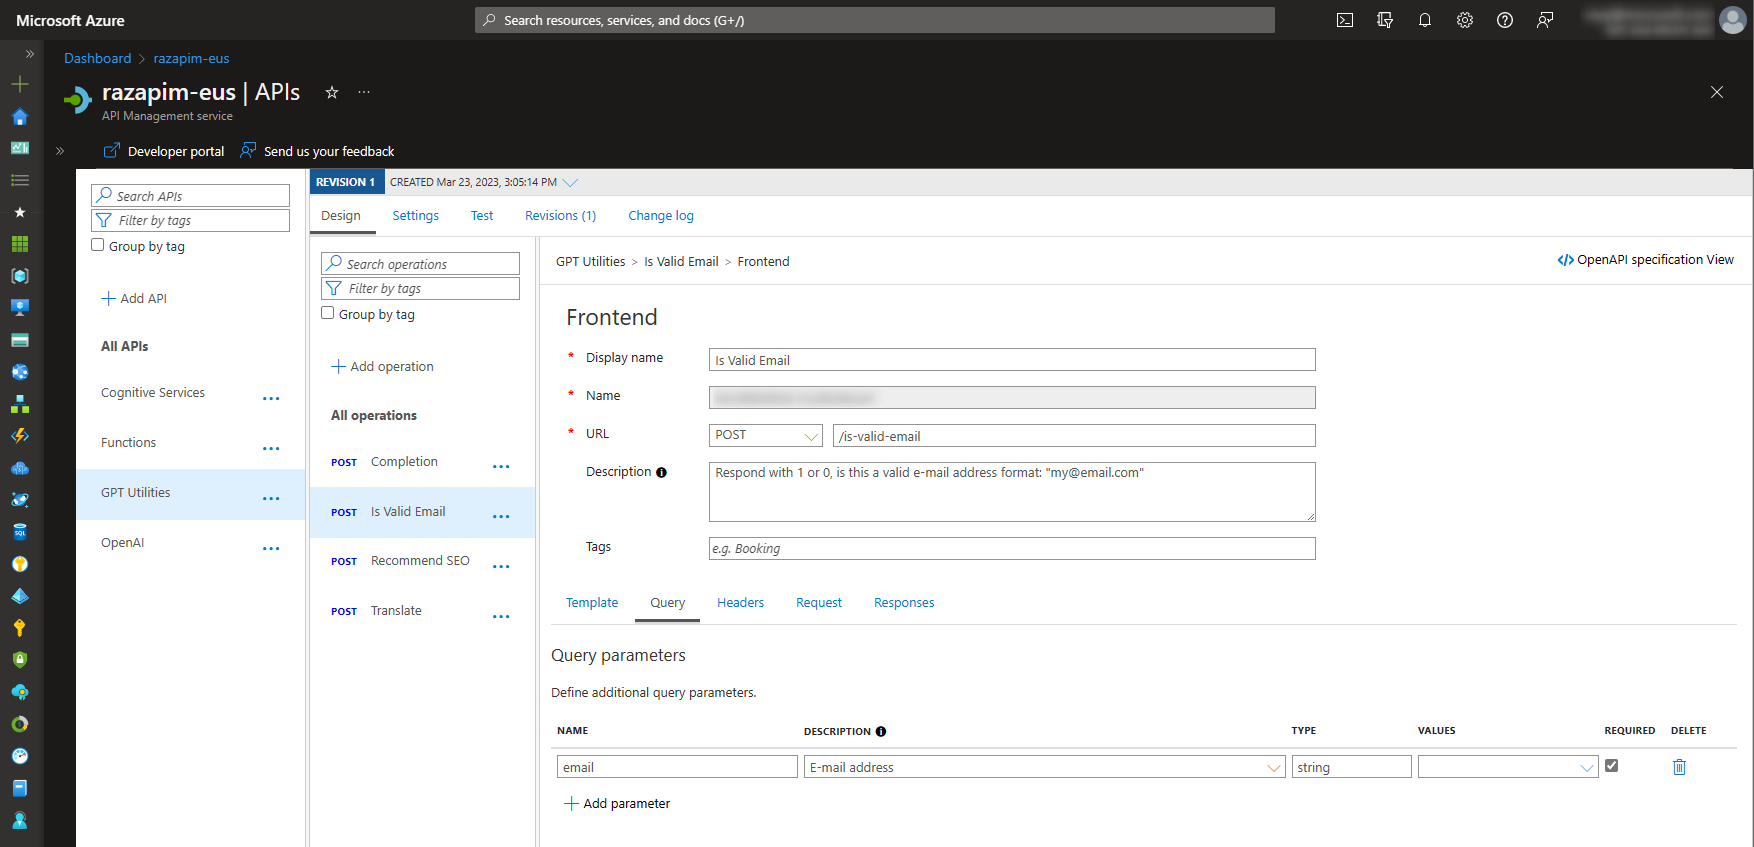
Sample - Check if the Input String has a Valid E-mail Address Format
For example, let’s create an API that takes in an email (string) and checks if the string has a valid e-mail address format.
The prompt will look like this:
1
Respond with 1 or 0, is this a valid e-mail address format: "{email}"
In API management, the inbound and outbound policy will look like this:
1
2
3
4
5
6
7
8
9
10
11
12
13
14
15
16
17
18
19
20
21
22
23
24
25
26
27
28
29
30
31
32
33
34
35
36
37
38
39
40
41
42
43
44
45
46
47
<policies>
    <inbound>
        <base />
        <rewrite-uri template="/openai/deployments/text-davinci-003/completions?api-version=2023-03-15-preview" copy-unmatched-params="true" />
        <set-header name="api-key" exists-action="override">
            <value></value>
        </set-header>
        <set-header name="Content-Type" exists-action="override">
            <value>application/json</value>
        </set-header>
        <set-body>@{
            var email = context.Request.Url.Query.GetValueOrDefault("email");
            var prompt = $"Respond with 1 or 0, is this a valid e-mail address format:\"{email}\"";

            return new JObject
            {
                { "prompt", prompt },
                { "max_tokens", 5 },
                { "n", 1 },
                { "temperature", 0.1 }
            }.ToString();
        }</set-body>
    </inbound>
    <backend>
        <base />
    </backend>
    <outbound>
        <base />
        <choose>
            <when condition="@(context.Response.StatusCode == 200)">
                <set-header name="Content-Type" exists-action="override">
                    <value>text/plain</value>
                </set-header>
                <set-body>@{
                    var response = context.Response.Body.As<JObject>();
                    var choice = response["choices"][0];
                    var result = choice["text"].ToString().Trim();

                    return result;
                }</set-body>
            </when>
        </choose>
    </outbound>
    <on-error>
        <base />
    </on-error>
</policies>
The Inbound Policy…
- Rewrites the URL to use the
text-davinci-003model and call the completion API. - Takes the
emailinput from the query parameter and creates a prompt string using C# syntax. - Changes the header to
application/jsonas specified by OpenAI’s completion API. - Sends a JSON body using the
JObjectclass to OpenAI’s completion API.- Since we are only expecting a response of
1or0, specify a minimalmax_token. - Since we do not want GPT to be “creative”, specify
temperature = 0.1. - Since we only need a single completion response, specify
n=0.
- Since we are only expecting a response of
Tip: Adjust the following and find what’s best for your API
model: Explore the different OpenAI models and find the one that gives the best result at the cheapest price.max_token: Since OpenAI charges by token count, understand how many tokens your API needs. Also take note of the token limit of yourmodel.temperature: Between 0 and 1. Do you want the response to be more precise or creative?
This is the APIM design in order to retrieve context.Request.Url.Query.GetValueOrDefault("email")
The Outbound Policy…
- Retrieves the
textvalue in the firstchoiceselement. - Returns simple
1or0value inContent-Type = text/plain.
Another Sample: Uncommon Language Translation
Following the same approach, we can create other types of APIs, like language translation to Singlish (or Singapore-English, a creole language that combines English, Chinese and Malay).
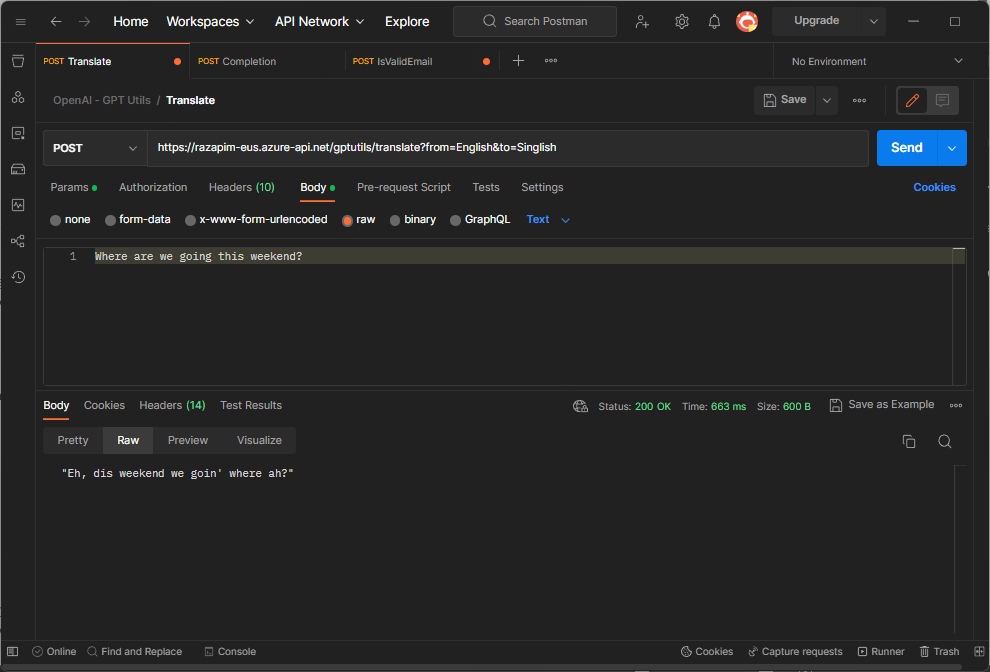 Uncommon Language Translation - from English to Singlish!
The policies for these samples are found in this GitHub repository.
Cache Policies
One of the things app developers do not necessarily like is when we call an API and the response is always slightly different. The OpenAI GPT models are like that. Fortunately, this can be circumvented with API management cache policies. As an additional benefit, it will also improve the API performance and reduce OpenAI token cost. To add caching, add the following to the inbound and outbound policies.
1
2
3
4
5
6
7
8
9
10
11
12
13
14
15
16
17
18
19
20
<policies>
    <inbound>
        <base />
        ...
        <cache-lookup vary-by-developer="false" vary-by-developer-groups="false">
            <vary-by-header>Accept</vary-by-header>
            <vary-by-header>Accept-Charset</vary-by-header>
            <vary-by-header>Authorization</vary-by-header>
        </cache-lookup>
    </inbound>
    ...
    <outbound>
        <base />
        ...
        <cache-store duration="20" />
    </outbound>
    <on-error>
        <base />
    </on-error>
</policies>
Publishing the APIs
Finally, it’s time to publish the APIs. Azure APIM has a way to add APIs to products and make them available to subscribers. This allows administrators to govern API usage and monitor API performance. Learn more about this here.

Additional Recommendations: DevOps and Ask Bing!
There you have it! I hope you enjoyed this article. Let me end with two additional recommendations in using Azure API Management.
- DevOps: Enterprise deployment of API management can be greatly improved by following this DevOps guidance. In writing this article, I am thinking of ways on how to avoid magic strings from code. Using APIM at least removes the
long promptstring constants from your code, but maybe there’s a way to inject prompts from a separate collection using DevOps. - Ask Bing: The new Bing helped me create the above policies. While coding, I was asking Bing with questions like this:
